Tuesday, February 28, 2006
Train to be a Nordic Walking Instructor - March 2006
. 
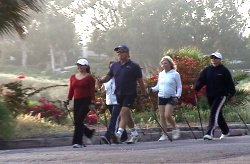
The American Nordic Walking Association (ANWA) will continue their education, instruction, and training programs with another Basic Instructor Certification Seminar on Saturday and Sunday, March 18 - 19, 2006. in Los Angeles
With the beautiful Los Angeles coastline as the backdrop you'll become certified in this exciting and growing sport!
To learn more or register for this training opportunity, please click here, to visit ANWA's Workshops and Seminars webpage.
Tuesday, February 21, 2006
Nordic Inline Skating (Nordic Blading) – Introduction #1
.
======================================================================
My thanks to my fellow UK instructor Heathley Clarke for this article. Heathley's company www.Nordic-fitness.co.uk specialises in providing instruction, coaching and guidance in all Nordic Fitness sports including Nordic Walking & Nordic Inline Skating (Nordic Blading)... David (Editor).
======================================================================
This article is the first in a series based around the Nordic Fitness concept, the first of which focuses on Nordic Inline Skating, or Nordic Blading, a complement to Nordic Walking.
The Nordic Fitness Concept
You may have heard about it. You may have seen it. Sometimes it’s termed ‘Nordic Blading’. It’s a recent introduction to the ‘Nordic Fitness concept. Nordic Inline Skating is the combination of using the cross-country skiing 'Skating' technique together with Inline Skates or Rollerblades.
Nordic Inline Skating is evolving as a fitness activity in its own right, and is an ideal compliment or extension to the more energetic Nordic Walker! The goal is on providing an all-body workout, with an emphasis on bio-mechanics and achieving a good sense of well-being.
Nordic Inline Skating features as part of the Nordic Fitness family of sports exercises that is very successful on mainland Europe, and has been pioneered in the UK since Summer 2004.
Adaptability – your choice!
Existing Inline Skaters/Rollerbladers, Nordic Walkers or people completely new to Skating or Skiing are able to pick up the basics of Nordic Inline Skating within a matter of hours. The attractions for most people are the added fun and safety elements that Inline Skates provide:
The principles of Nordic Inline Skating are similar to that of Nordic Walking – you use poles as a means to provide upper body exercise – with the obvious difference that your legs do not operate in a ‘diagonal stride’ and that momentum is much faster. The poles are longer than those used for Nordic Walking. For Nordic Inline Skating, poles that reach to one’s chin are perfect to aid upper body power transmission.
Of course, when using Inline Skates you have a choice as to whether you employ the poles, or simply enjoy Skating without them.
Technique Overview
The techniques used for Nordic Inline Skating are (Cross-Country Skiing equivalent):
Equipment (Skates and Poles)
The equipment used for Nordic Inline Skating is evolving. Good recreational or fitness Inline Skates/Rollerblades will suffice, although a couple of manufacturers have developed special Skates. Due to the speeds attainable, and to aid confidence, Helmet (bicycle helmet is suitable), Knee and Elbow pads should be worn at all times.
Exel of Finland have introduced a range of special poles for Nordic Inline Skating that use a spiketip pad. The pad provides very effective shock absorption, whilst the small spike provides a good plant; the combination is extremely effective.
Enjoy Nordic Inline Skating
The popularity of Nordic Inline Skating is set to increase exponentially over the coming years. The combination of using Inline Skates to practice the Skating style of cross-country skiing, and to simulate some Alpine skiing techniques, is quite unique, providing the enthusiast with an all-year activity (training for Winter or otherwise).
Nordic Inline Skating can take place anywhere where there is suitable tarmac. In the UK there are several venues used in and around London and the South where conditions are ideal. Why not give it a try?
Heathley Clarke
www.nordic-fitness.co.uk
Editor Note: Nordic Inline Skating (Nordic Blading) is not restricted to the UK. Check out with the relevent Nordic Walking associations in your country or do an online search to find out more.
======================================================================
My thanks to my fellow UK instructor Heathley Clarke for this article. Heathley's company www.Nordic-fitness.co.uk specialises in providing instruction, coaching and guidance in all Nordic Fitness sports including Nordic Walking & Nordic Inline Skating (Nordic Blading)... David (Editor).
======================================================================
This article is the first in a series based around the Nordic Fitness concept, the first of which focuses on Nordic Inline Skating, or Nordic Blading, a complement to Nordic Walking.
The Nordic Fitness Concept
You may have heard about it. You may have seen it. Sometimes it’s termed ‘Nordic Blading’. It’s a recent introduction to the ‘Nordic Fitness concept. Nordic Inline Skating is the combination of using the cross-country skiing 'Skating' technique together with Inline Skates or Rollerblades.
Nordic Inline Skating is evolving as a fitness activity in its own right, and is an ideal compliment or extension to the more energetic Nordic Walker! The goal is on providing an all-body workout, with an emphasis on bio-mechanics and achieving a good sense of well-being.
Nordic Inline Skating features as part of the Nordic Fitness family of sports exercises that is very successful on mainland Europe, and has been pioneered in the UK since Summer 2004.
Adaptability – your choice!
Existing Inline Skaters/Rollerbladers, Nordic Walkers or people completely new to Skating or Skiing are able to pick up the basics of Nordic Inline Skating within a matter of hours. The attractions for most people are the added fun and safety elements that Inline Skates provide:
- Manoeuvrability and flexibility in performing ‘Alpine’ style slalom turns;
- Safe stopping using the heel brake, applying a ‘Spin Stop’, or performing a ‘U-turn’;
- Use of wheels to simulate ‘edging’ for tight turning;
- Immediate responsiveness to foot pressure and weight transfer;
- Opportunity to practice ‘Classic’ skiing;
- ‘Stepover’ turning and tricks; and
- Achieving high speeds on downhills – if that’s your goal!
The principles of Nordic Inline Skating are similar to that of Nordic Walking – you use poles as a means to provide upper body exercise – with the obvious difference that your legs do not operate in a ‘diagonal stride’ and that momentum is much faster. The poles are longer than those used for Nordic Walking. For Nordic Inline Skating, poles that reach to one’s chin are perfect to aid upper body power transmission.
Of course, when using Inline Skates you have a choice as to whether you employ the poles, or simply enjoy Skating without them.
Technique Overview
The techniques used for Nordic Inline Skating are (Cross-Country Skiing equivalent):
- 1-2 (or Skate 3) – which is the most used technique;
- 1-1 (or Skate 2); and
- 1-2 Asymmetrical (or Skate 1) – although arm positioning is different to Skate 1, hence the term ‘Asymmetrical’.
Equipment (Skates and Poles)
The equipment used for Nordic Inline Skating is evolving. Good recreational or fitness Inline Skates/Rollerblades will suffice, although a couple of manufacturers have developed special Skates. Due to the speeds attainable, and to aid confidence, Helmet (bicycle helmet is suitable), Knee and Elbow pads should be worn at all times.
Exel of Finland have introduced a range of special poles for Nordic Inline Skating that use a spiketip pad. The pad provides very effective shock absorption, whilst the small spike provides a good plant; the combination is extremely effective.
Enjoy Nordic Inline Skating
The popularity of Nordic Inline Skating is set to increase exponentially over the coming years. The combination of using Inline Skates to practice the Skating style of cross-country skiing, and to simulate some Alpine skiing techniques, is quite unique, providing the enthusiast with an all-year activity (training for Winter or otherwise).
Nordic Inline Skating can take place anywhere where there is suitable tarmac. In the UK there are several venues used in and around London and the South where conditions are ideal. Why not give it a try?
Heathley Clarke
www.nordic-fitness.co.uk
Editor Note: Nordic Inline Skating (Nordic Blading) is not restricted to the UK. Check out with the relevent Nordic Walking associations in your country or do an online search to find out more.
Tom Rutlin's 21 Years of Nording Walking with his Canine Friends
.
====================================================================== Photo (left to right): Tom's canine friends Willy and Max, alongside Tom's wife Wendy, Tom himself and their friends Gerri and Ray.
======================================================================
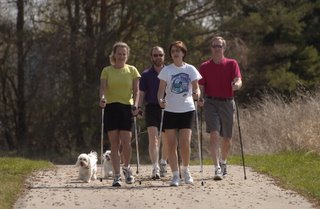 To Jeanne (February 8th posting) and other dog loving Nordic Walkers: I have been Nordic walking with my canine friends for nearly 21 years now. My first dog Casey walked with me for more than 15 of his 17 years. (I'm convinced that he lived such a long, healthy life mainly because of our near daily 2-3 mile "quadruped strides" together.)
When Casey left us, we soon got Willy, and a year later, his brother Max (both Bijon Frise, cocker, poodle mixes). They both took to our walking with poles just as fast as Casey had.
We too have always used a waist pack and looped the leash around it. We've found over the years that a fixed length leash works best. If it is just a bit longer than from the waist to the ground, when fastened to the dog's collar it keeps them close enough, but not too close. (Since we began walking with two dogs at once, we've found that a single leash that has two short leads attached to the end keeps them striding along side one another and eliminates a May pole-like weaving of two leashes over the course of a walk.)
We are not dog trainers, but in each case so far it has taken very little time for our dogs to learn to walk either along side of us or just behind us.
They also learned very quickly the difference between walking for exercise and an ordinary "stop and sniff everything in sight" walk. When we pick up our poles and fasten them to the special leash they quickly learn to request stops only when it is actually necessary. They seem to love quadruped exercising walking every bit as much as we do.
When we walk them on an ordinary leash, they still seldom go more than a few feet without stopping to sniff and/or leave their marks.
Our dogs have all been around 10 pounds, but we have several friends with 60 pound plus labs and retrievers that have had pretty much the same experience. With larger dogs that have the potential to do some damage if they suddenly bolt after a squirrel of cat while fastened securely to you, I recommend the use of a leash with a section of sufficiently strong bungee cord attaching it to the belt or waist pack. That way if the dog suddenly pulls you'll have a chance to brace yourself and prevent a possible dislocation of some body part before it occurs.
When we pass others (bikes, cars, people or pooches) on the sidewalks, streeets or trails, I just hold both poles back to create a little chute-like enclosure (me as the front, the two poles as the sides and the length of the leash restricting escape from the back) and that way we don't end up creating an unwanted obstruction to traffic.
I hope these tips are useful to all who would like to share their Nordic walking experience with their canine friends.
Stay Well,

Tom Rutlin
www.nordicwalking.us
====================================================================== Photo (left to right): Tom's canine friends Willy and Max, alongside Tom's wife Wendy, Tom himself and their friends Gerri and Ray.
======================================================================
 To Jeanne (February 8th posting) and other dog loving Nordic Walkers: I have been Nordic walking with my canine friends for nearly 21 years now. My first dog Casey walked with me for more than 15 of his 17 years. (I'm convinced that he lived such a long, healthy life mainly because of our near daily 2-3 mile "quadruped strides" together.)
When Casey left us, we soon got Willy, and a year later, his brother Max (both Bijon Frise, cocker, poodle mixes). They both took to our walking with poles just as fast as Casey had.
We too have always used a waist pack and looped the leash around it. We've found over the years that a fixed length leash works best. If it is just a bit longer than from the waist to the ground, when fastened to the dog's collar it keeps them close enough, but not too close. (Since we began walking with two dogs at once, we've found that a single leash that has two short leads attached to the end keeps them striding along side one another and eliminates a May pole-like weaving of two leashes over the course of a walk.)
We are not dog trainers, but in each case so far it has taken very little time for our dogs to learn to walk either along side of us or just behind us.
They also learned very quickly the difference between walking for exercise and an ordinary "stop and sniff everything in sight" walk. When we pick up our poles and fasten them to the special leash they quickly learn to request stops only when it is actually necessary. They seem to love quadruped exercising walking every bit as much as we do.
When we walk them on an ordinary leash, they still seldom go more than a few feet without stopping to sniff and/or leave their marks.
Our dogs have all been around 10 pounds, but we have several friends with 60 pound plus labs and retrievers that have had pretty much the same experience. With larger dogs that have the potential to do some damage if they suddenly bolt after a squirrel of cat while fastened securely to you, I recommend the use of a leash with a section of sufficiently strong bungee cord attaching it to the belt or waist pack. That way if the dog suddenly pulls you'll have a chance to brace yourself and prevent a possible dislocation of some body part before it occurs.
When we pass others (bikes, cars, people or pooches) on the sidewalks, streeets or trails, I just hold both poles back to create a little chute-like enclosure (me as the front, the two poles as the sides and the length of the leash restricting escape from the back) and that way we don't end up creating an unwanted obstruction to traffic.
I hope these tips are useful to all who would like to share their Nordic walking experience with their canine friends.
Stay Well,
Tom Rutlin
www.nordicwalking.us
Sunday, February 19, 2006
Nordic Walking & Cross-Country Skiing - Part 2
.
====================================================================
With thanks to Stuart Montgomery for writing this article. Stuart is a Director of XCuk - http://www.xcuk.com/ a UK based company that specializes in Cross Country Skiing & Nordic Walking Holidays. Stuart is also an INWA Certified Nordic Walking Instructor offering classes in Berkshire and Buckinghamshire.
====================================================================
In part 1 of this article (last week), I looked at how newcomers to cross-country skiing could use nordic walking as technical preparation for their first outing on snow. This second article is mainly for people who have done some cross-country skiing and now want to use nordic walking to help develop their skiing technique. But I hope it is also of interest to experienced nordic walkers who are ready for a bit of variety. It is always good to play with techniques, to try new things and discover what works for you.
Using the upper body - poling
The poling action in cross-country skiing is like the poling action in nordic walking - only more so! It consists of a pull down, then a strong push that extends back, well behind the hip, as you extend your straightened arm back as far you can. Finally, you release the grip with a flick of the wrist and the fingers, almost as if you were trying to throw the pole away behind you.
Standard nordic walking technique simulates this fairly closely, but if you are a skier looking for maximum benefit from nordic walking you should try to open your arms out even more than in standard technique – the leading arm should reach well in front, and the other arm extend well behind. To keep arms and legs in sync you will need to lengthen your stride considerably – and it also helps if you put a spring in your step by pushing firmly off the ball of each foot.
As with any change of technique, it’s best to go slowly until you get the hang of things. But when you do have the hang of things – just go for it! You should find that the extra oomph in your poling, combined with the accentuated foot-roll, sends you flying along.
Some nordic walking instructors recommend keeping the leading arm straight while poling, while others insist that the arm should be bent. There is a similar division in cross-country skiing. The current official British instructors’ manual says that the elbow of the forward arm should be "flexed to 90 degrees". ..
But some instructors prefer just a slight bend in the arm (and they point out that the previous edition of the manual recommended just that!) For the great mass of skiers, however, this is rather an esoteric squabble, and most people bend or straighten their arm as the mood takes them. Personally I think the main thing is to be aware that you have the choice. And I always urge people to try both.
In standard nordic walking you should roll your shoulders from side to side, swagger a little. You're John Wayne, and you've come for your boy. The idea is to set up a rotation of the shoulder girdle that works in opposition to the rotation of your pelvic girdle. (Your shoulders go left-right while your hips go right-left.) This causes a repeated gentle twisting of the upper body - which brings great benefits to muscles and joints.
Unfortunately, it promotes lousy ski technique. The problem is that the swagger tends to bring your leading hand across the centre of your body. And that makes you push your pole back at an angle to your direction of travel. Do this while skiing and all the other skiers will overtake you – it is inefficient propulsion. It is much better to keep your poles moving in a straight line backwards and forwards - i.e. parallel to your direction of travel.
Using the lower body - striding
In standard nordic walking, the foot strike starts with the heel, then you unroll your foot as you come forward and push off with the ball of your foot.
With skis on, you just can’t do that. Athletic skiers lead with their hips, accentuating the rotation of the pelvis in order to force a little more drive into the ski-stride. You can get a feel for this in nordic walking. Make a deliberate attempt to swing those hips, trying to push yourself forward from the hips. You should feel yourself going faster.
Double poling
Cross-country skiers use double-poling to move fast over easy terrain. The skier plants both poles at the same time, then bends strongly and deeply forward at the waist. This allows abdominal and lower back muscles to contribute most of the propulsive force.
In nordic walking - without skis to glide on - we simply can’t bend forward at the waist. But we can still reach an approximation of the skiing technique. The first challenge is to sort out the timing: when nordic walking I take four strides between each double pole plant, but many people take two, and I’ve seen some take three. Find out what works for you. Then you need to be careful to avoid muscle strain – double poling while nordic walking is hard work, so be careful not to overdo it.
When you have gotten the hang of things it is fun to mix double poling in with normal alternate striding. Try this:
Double-pole once (taking as many steps as you need to complete the move). Then take four normal alternate strides, poling on each stride
Then double pole once. Then take another four normal alternate strides, poling on each stride and keep it going.
You will be pleased to know that you are well on the way to mastering the "Swedish five-phase" – a technique used by ski racers to help vary their muscle workout – and keep their interest up. Even elite competitors would find it tedious to use the same technique for an entire race.
Going uphill
When face with a short climb, standard nordic walking technique would be: lean into the hill a little and lengthen your stride.
However if you are trying to develop skiing technique you should shorten your stride and jog up the hill. And put a spring in your step. As you jog, concentrate on transferring your body weight from one foot to the other – you will rock a little from side to side. And don’t lean so far forward.
(What you are simulating is the action of flattening your skis down on to the snow).
If you lay a cross-country ski base-down on the snow you will see that the front third (the tip) and the rear third (the tail) are flat. But the middle third is slightly arched, and rises up above the snow. When skiing you apply wax to this middle third. The wax grips into the snow, and lets you climb the hill. In order to make the wax grip, you have to flatten the ski on to the snow.)
What goes up must come down, and a skier who has reached the top of a hill can usually look forward to an adrenaline charged schuss down the other side. Alas, nordic walking can offer no such thrills!
Stuart Montgomery
http://www.xcuk.com
====================================================================
With thanks to Stuart Montgomery for writing this article. Stuart is a Director of XCuk - http://www.xcuk.com/ a UK based company that specializes in Cross Country Skiing & Nordic Walking Holidays. Stuart is also an INWA Certified Nordic Walking Instructor offering classes in Berkshire and Buckinghamshire.
====================================================================
In part 1 of this article (last week), I looked at how newcomers to cross-country skiing could use nordic walking as technical preparation for their first outing on snow. This second article is mainly for people who have done some cross-country skiing and now want to use nordic walking to help develop their skiing technique. But I hope it is also of interest to experienced nordic walkers who are ready for a bit of variety. It is always good to play with techniques, to try new things and discover what works for you.
Using the upper body - poling
The poling action in cross-country skiing is like the poling action in nordic walking - only more so! It consists of a pull down, then a strong push that extends back, well behind the hip, as you extend your straightened arm back as far you can. Finally, you release the grip with a flick of the wrist and the fingers, almost as if you were trying to throw the pole away behind you.
Standard nordic walking technique simulates this fairly closely, but if you are a skier looking for maximum benefit from nordic walking you should try to open your arms out even more than in standard technique – the leading arm should reach well in front, and the other arm extend well behind. To keep arms and legs in sync you will need to lengthen your stride considerably – and it also helps if you put a spring in your step by pushing firmly off the ball of each foot.
As with any change of technique, it’s best to go slowly until you get the hang of things. But when you do have the hang of things – just go for it! You should find that the extra oomph in your poling, combined with the accentuated foot-roll, sends you flying along.
Some nordic walking instructors recommend keeping the leading arm straight while poling, while others insist that the arm should be bent. There is a similar division in cross-country skiing. The current official British instructors’ manual says that the elbow of the forward arm should be "flexed to 90 degrees". ..
But some instructors prefer just a slight bend in the arm (and they point out that the previous edition of the manual recommended just that!) For the great mass of skiers, however, this is rather an esoteric squabble, and most people bend or straighten their arm as the mood takes them. Personally I think the main thing is to be aware that you have the choice. And I always urge people to try both.
In standard nordic walking you should roll your shoulders from side to side, swagger a little. You're John Wayne, and you've come for your boy. The idea is to set up a rotation of the shoulder girdle that works in opposition to the rotation of your pelvic girdle. (Your shoulders go left-right while your hips go right-left.) This causes a repeated gentle twisting of the upper body - which brings great benefits to muscles and joints.
Unfortunately, it promotes lousy ski technique. The problem is that the swagger tends to bring your leading hand across the centre of your body. And that makes you push your pole back at an angle to your direction of travel. Do this while skiing and all the other skiers will overtake you – it is inefficient propulsion. It is much better to keep your poles moving in a straight line backwards and forwards - i.e. parallel to your direction of travel.
Using the lower body - striding
In standard nordic walking, the foot strike starts with the heel, then you unroll your foot as you come forward and push off with the ball of your foot.
With skis on, you just can’t do that. Athletic skiers lead with their hips, accentuating the rotation of the pelvis in order to force a little more drive into the ski-stride. You can get a feel for this in nordic walking. Make a deliberate attempt to swing those hips, trying to push yourself forward from the hips. You should feel yourself going faster.
Double poling
Cross-country skiers use double-poling to move fast over easy terrain. The skier plants both poles at the same time, then bends strongly and deeply forward at the waist. This allows abdominal and lower back muscles to contribute most of the propulsive force.
In nordic walking - without skis to glide on - we simply can’t bend forward at the waist. But we can still reach an approximation of the skiing technique. The first challenge is to sort out the timing: when nordic walking I take four strides between each double pole plant, but many people take two, and I’ve seen some take three. Find out what works for you. Then you need to be careful to avoid muscle strain – double poling while nordic walking is hard work, so be careful not to overdo it.
When you have gotten the hang of things it is fun to mix double poling in with normal alternate striding. Try this:
Double-pole once (taking as many steps as you need to complete the move). Then take four normal alternate strides, poling on each stride
Then double pole once. Then take another four normal alternate strides, poling on each stride and keep it going.
You will be pleased to know that you are well on the way to mastering the "Swedish five-phase" – a technique used by ski racers to help vary their muscle workout – and keep their interest up. Even elite competitors would find it tedious to use the same technique for an entire race.
Going uphill
When face with a short climb, standard nordic walking technique would be: lean into the hill a little and lengthen your stride.
However if you are trying to develop skiing technique you should shorten your stride and jog up the hill. And put a spring in your step. As you jog, concentrate on transferring your body weight from one foot to the other – you will rock a little from side to side. And don’t lean so far forward.
(What you are simulating is the action of flattening your skis down on to the snow).
If you lay a cross-country ski base-down on the snow you will see that the front third (the tip) and the rear third (the tail) are flat. But the middle third is slightly arched, and rises up above the snow. When skiing you apply wax to this middle third. The wax grips into the snow, and lets you climb the hill. In order to make the wax grip, you have to flatten the ski on to the snow.)
What goes up must come down, and a skier who has reached the top of a hill can usually look forward to an adrenaline charged schuss down the other side. Alas, nordic walking can offer no such thrills!
Stuart Montgomery
http://www.xcuk.com
Nordic Walking eCommunity Celebrates 200 Members!
.
Wow - Only 5 weeks after launch and my other project - Nordic Walking eCommunty now has 200 members and almost 200 postings. Amazing!
Thank you to everyone both enthusiasts and fellow instructors for your support. Thank you also for the very kind emails of support I receive for both projects - I assure you they are most appreciated. I am so glad to be able to provide a worldwide service to the Nordic Walking Community that appears to help so many people.
If you haven't had chance to check out the eCommunity yet here is the link:
http://groups.yahoo.com/group/nordicwalkingecommunity/
Thanks everyone
David
Monday, February 13, 2006
Nordic Walking & Cross-Country Skiing - Part 1
.
====================================================================
With thanks to Stuart Montgomery for writing this article. Stuart is a Director of XCuk - http://www.xcuk.com a UK based company that specializes in Cross Country Skiing & Nordic Walking Holidays. Stuart is also an INWA Certified Nordic Walking Instructor offering classes in Berkshire and Buckinghamshire.
====================================================================
As a nordic walking instructor I often have enquiries from people who want to know if nordic walking will help them prepare for cross-country skiing. My answer is, emphatically, yes. Firstly it is good physical preparation, in terms of both stamina and muscle endurance.
Nordic walking has evolved out of cross-country skiing and the physical requirements are similar. But secondly – and this is not so obvious – the technical demands are also very similar.
In this article I look at how beginners can use nordic walking to prepare themselves for cross-country skiing. In a later article I will show how experienced skiers can use nordic walking to reinforce and develop their skiing technique.
Let’s start with the beginners.
Think back to the first time you went nordic walking. As you took your first strides with poles you probably had some initial difficulty with the arm-leg coordination. Many people do, and I’ve grown used to seeing beginners walk along with furrowed brow, concentrating intensely on some inner mantra – "Left leg, right arm. Left leg, right arm".
But after a while on that first session it will have started to come together, and you will have felt that you were getting the hang of things. However at just that point your instructor will have said "That’s very good. Now I would like you to push back a little harder on the poles." And that will have messed everything up! Your hard-earned coordination was lost. And you will have realised that your technique had to change. You needed to lengthen and slow down your stride in order to accommodate the new poling action.
It probably took a few minutes to figure out the new coordination and get happy with it. And then, at just about the point when you felt you were again getting the hang of things, your instructor will have said "That’s really very good. Now let’s work on rolling the foot as we walk."...And that will have messed everything up again!!
It was complicated, wasn’t it? You not only had to learn a new kind of coordination of arms and legs. But you also had to learn that if you change what you do with your arms, you have to change what you do with your legs. And vice-versa. It was a valuable lesson in body-awareness. But it took a bit of thought.
Now imagine how newcomers to cross-country skiing must feel. They have to learn the same fundamental lessons, for the basic stride in cross-country skiing is similar to the basic stride in nordic walking. And they have to learn to change their leg action whenever they vary the intensity of their poling.
...But – as if that wasn’t enough - they have to cope with the additional complications of slippery snow, skis that seem terrifically impatient to go speeding off across the slippery snow, and intimidatingly long poles, typically about 20cm longer than nordic walking poles. These beginners have an enormously steep learning curve, and some of them will find the experience very challenging.
They could make it very much easier for themselves by investing a few hours in learning nordic walking before travelling to the snow. In doing so they would learn valuable basic skills. Of course when they did get on to snow they would need to alter those skills to make them suitable to the skiing environment. But it is a great deal easier to fine-tune existing skills than to learn new ones from scratch.
So – how should budding cross-country skiers approach nordic walking? Their first priority must be to get used to the basic stride in nordic walking. The idea is simply to get to the stage where walking with poles feels like second nature.
Next, they should experiment - playing with different stride lengths and different speeds, and testing themselves on different kinds of terrain, hills as well as flat ground. The idea now is simply to get used to variation per se – so that it feels like second nature to change technique and speed at will. This will help them – when they do arrive on snow – to make the transition from walking to skiing, from striding to gliding.
In nordic walking a single walking stride will take you a distance of three or four feet. But in cross-country skiing a single gliding stride will carry you twice that distance even if you are a beginner, and several times as far once you know what you are doing.
...In order to cope with this new "stride length" a novice skier has to learn to slow down the body tempo, to take extra long strides, and to match poling intensity very carefully to stride length (which is to say, if you pole just a little bit harder, you need to let your skis glide quite a lot further). All this is quite tricky, and the excusable tendency for the inexperienced skier is to panic and fall over.
The experienced nordic walker, however, should be able to face the challenge more calmly – to say "In principle I know what is happening here. I just need to experiment a little to get the details right."
Stuart Montgomery
http://www.xcuk.com
====================================================================
With thanks to Stuart Montgomery for writing this article. Stuart is a Director of XCuk - http://www.xcuk.com a UK based company that specializes in Cross Country Skiing & Nordic Walking Holidays. Stuart is also an INWA Certified Nordic Walking Instructor offering classes in Berkshire and Buckinghamshire.
====================================================================
As a nordic walking instructor I often have enquiries from people who want to know if nordic walking will help them prepare for cross-country skiing. My answer is, emphatically, yes. Firstly it is good physical preparation, in terms of both stamina and muscle endurance.
Nordic walking has evolved out of cross-country skiing and the physical requirements are similar. But secondly – and this is not so obvious – the technical demands are also very similar.
In this article I look at how beginners can use nordic walking to prepare themselves for cross-country skiing. In a later article I will show how experienced skiers can use nordic walking to reinforce and develop their skiing technique.
Let’s start with the beginners.
Think back to the first time you went nordic walking. As you took your first strides with poles you probably had some initial difficulty with the arm-leg coordination. Many people do, and I’ve grown used to seeing beginners walk along with furrowed brow, concentrating intensely on some inner mantra – "Left leg, right arm. Left leg, right arm".
But after a while on that first session it will have started to come together, and you will have felt that you were getting the hang of things. However at just that point your instructor will have said "That’s very good. Now I would like you to push back a little harder on the poles." And that will have messed everything up! Your hard-earned coordination was lost. And you will have realised that your technique had to change. You needed to lengthen and slow down your stride in order to accommodate the new poling action.
It probably took a few minutes to figure out the new coordination and get happy with it. And then, at just about the point when you felt you were again getting the hang of things, your instructor will have said "That’s really very good. Now let’s work on rolling the foot as we walk."...And that will have messed everything up again!!
It was complicated, wasn’t it? You not only had to learn a new kind of coordination of arms and legs. But you also had to learn that if you change what you do with your arms, you have to change what you do with your legs. And vice-versa. It was a valuable lesson in body-awareness. But it took a bit of thought.
Now imagine how newcomers to cross-country skiing must feel. They have to learn the same fundamental lessons, for the basic stride in cross-country skiing is similar to the basic stride in nordic walking. And they have to learn to change their leg action whenever they vary the intensity of their poling.
...But – as if that wasn’t enough - they have to cope with the additional complications of slippery snow, skis that seem terrifically impatient to go speeding off across the slippery snow, and intimidatingly long poles, typically about 20cm longer than nordic walking poles. These beginners have an enormously steep learning curve, and some of them will find the experience very challenging.
They could make it very much easier for themselves by investing a few hours in learning nordic walking before travelling to the snow. In doing so they would learn valuable basic skills. Of course when they did get on to snow they would need to alter those skills to make them suitable to the skiing environment. But it is a great deal easier to fine-tune existing skills than to learn new ones from scratch.
So – how should budding cross-country skiers approach nordic walking? Their first priority must be to get used to the basic stride in nordic walking. The idea is simply to get to the stage where walking with poles feels like second nature.
Next, they should experiment - playing with different stride lengths and different speeds, and testing themselves on different kinds of terrain, hills as well as flat ground. The idea now is simply to get used to variation per se – so that it feels like second nature to change technique and speed at will. This will help them – when they do arrive on snow – to make the transition from walking to skiing, from striding to gliding.
In nordic walking a single walking stride will take you a distance of three or four feet. But in cross-country skiing a single gliding stride will carry you twice that distance even if you are a beginner, and several times as far once you know what you are doing.
...In order to cope with this new "stride length" a novice skier has to learn to slow down the body tempo, to take extra long strides, and to match poling intensity very carefully to stride length (which is to say, if you pole just a little bit harder, you need to let your skis glide quite a lot further). All this is quite tricky, and the excusable tendency for the inexperienced skier is to panic and fall over.
The experienced nordic walker, however, should be able to face the challenge more calmly – to say "In principle I know what is happening here. I just need to experiment a little to get the details right."
Stuart Montgomery
http://www.xcuk.com
Wednesday, February 08, 2006
Nordic Walking with our Canine Friends
.
From: Jeanne Goldberg
Philadelphia, PA
My dog, Lucy, a Cocker Spaniel, is my steady partner in Nordic Walking. Except for an instructors course I took with ANWA (American Nordic Walking Association), she has been with me on every walk. We have walked on nice sunny days, in pouring rain and in the cold--pretty close to freezing.
In the past, when I took her out to the park, she got no exercise and neither did I. Of course she didn't particularly want to be fit, she just liked to smell every pole and tree. I walked along a little depressed because I live in the city and had to take her out many times a day, each time getting no exercise.I always start out giving her time for her "pit stops" and then give her a few along the way. I don't stay long. I say WALK with a strong voice and she know I mean "get going."
Once in a while she smells something along the way that interests her and she tries to get me to stop. Sometimes I do, but not always. I just stop to let her "go." I wear a 'belly bag' and hook her leash onto that. I give her enoughroom to avoid the poles but not so much she would be too far away and endanger herself or get in the way of others.
I always make sure to take water for both of us. It is also important to watch where you walk. We have some trees at the waterfront where I often walk that drops seed balls with spikes and I have to be carefulshe does not step on them. When I cross a street I usually grab the leach because the lights are not long and I have to move fast. I also want to make sure she is near me in case a reckless motorist pulls out too fast.
I have walked on wooded trails, along the waterfront, along a lake and on hardtop with her. We did our first five mile hike this week. I usually keep her on the side away from traffic. I have a retractable leach and you have to make sure it is closed sothe dog does not pull away from you. Mine was open one time and she went behind me and out in front of a bicycle that was going by. A lady screamed but he did not stop. The leach caught my wrist andI got a big gash in it before the bike broke the cord. That hurt! I have a scar that looks like I tried to slit my wrist.
I am talking to a dog trainer about putting together a program for Nordic Walkers and their dogs. I figure if we have a few dogs together we might have some new challenges that he could help us with.
Lucy says hello....
Enjoy!
Jeanne
Quick Technique Tips
. 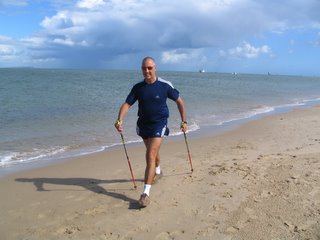
1) Plant your poles at an angle of around 45% to the ground (see my right arm in photo). This will mean that the pole tip will tend to plant slightly behind the hip
2) I recommend planting with a straight arm (slightly soft elbow). Keep the arm straight as you push down to the hip and then through behind the hip (see photo). This straight arm (pump handle) action (versus a bent arm action), will maximize muscle recruitment in the upper body including the 'core' musculature (for the mechanically minded it's all about 'long levers' versus 'short levers').
3) As you push on past the hip, open your hand and release the pole. As your arm swings forward again (pole trailing from the wrist strap), prepare to catch the handle in time for the next 'plant'.
4) Under normal conditions, you only really grip the pole handles as you 'catch' and 'plant'. As you push down through the straps and towards the hip, you are already releasing your grip (an analogy we use is... imagine you are 'milking a cow'!) As the pole handle passes the hip, remember to 'open' your hand completely.
Have Fun and remember....Practice makes perfect!
David
Thursday, February 02, 2006
Tom - One Week On (an update)
.
For those who have found reading about my client Tennis player Tom, who is rehabbing from serious surgery, interesting - Here is a summary of this weeks session plus homework:
We established a method to analyse Tom's pain and discomfort level when weight bearing on his right foot / ankle. These were the results on a scale of 1 – 10 (1 = no pain / discomfort), 10 = unbearable pain / discomfort.
Session 1 (at the Physios 3 weeks ago to the day):
- Walking (with difficulty) 'without' poles 8 out of 10
Session 5 (this week):
- Walking 'without' poles (rolling through ball of foot) = 5 out of 10
- Walking 'without' poles (no roll) = 3 out of 10
- Walking 'with' poles (rolling through ball of foot) = 2 to 3 out of 10
- Walking 'with' poles (no roll) = 1 out of 10 (no pain or discomfort)
Tom's Goal: One of Tom's goals is to achieve a 1 out of 10 eg no pain or discomfort whilst walking without poles rolling through the ball of the foot (currently it's a 5 having started 4 weeks ago as an 8)
We practiced walking the white line. Tom was very comfortable doing this whilst placing his foot down straight using poles. He was fine placing the foot down straight without poles although there was a degree of discomfort. We also did further practice on rolling through the ball of the foot.
Hills - I decided to try Tom out on a hill:
Uphill technique:
- Lean into hill (the steeper the hill the more the lean). The lean comes from the ankle not the waist.
- Strong arms
- Maintain pace Tom needed to adapt this depending on the degree of discomfort)
Note: Walking uphill will encourage Tom to roll through the ball of the foot which is why I chose to do the hill exercise.
Downhill technique:
- Bend knees & sit back (the steeper the hill the more the bend & sit back
- Slow your pace
- Emphasise heel plant more
- Bear down on poles to control descent
After the hill session we looked at and discussed the topics for his homework this week as set out below.
Tom's Homework practice this week:
Continue with last week’s exercises and in addition:
Note: Tom found that upping his walking time didn't work for him. After 30 minutes walking he felt that his ankle had had enough. So we are sticking with 30 minute walks for now.
Do plenty of ankle mobility work eg sat in a chair focusing on putting the ankle through its ranges of movement very slowly. Eg: Point & flex / Turn inwards and outwards / Ankle circles in both directions (biggest range of movement possible on all exercises).
Remember before attempting any exercise know ‘why you are doing it’. Focus on that reason or reasons as you do the exercise.
When you go out for your walks, don’t just walk for walking sake. Decide what exactly it is that you are working on at any particular moment. Eg 1) Focus on walking the white line, placing foot down straight / slightly turned in 2) Focus on planting the heel down and rolling through the ball of the foot. 3) Focus on pushing down hard through the straps to engage the upper body muscles harder 4) Focus on ‘Push behind hip’ 5) Focus on ‘open hand’ (releasing handle) .6) Focus on ‘double poling’. Remember: Totally focus on one thing at a time.
Note: These are guidelines only – Tom knows that it is important to listen to what his body / ankle is telling him– Don’t over do it but don’t under do it either. The ‘rest’ that his ankle gets is as important as the ‘work’ it gets.
![]()

